Migrate Outlook to A New Computer: Preserve Your Outlook Data and Settings
Moving to a new computer doesn't mean that you have to leave behind your valuable Outlook email data and settings. With a systematic approach and the right tools, migrating Outlook to a new computer can be a straightforward process. This step-by-step guide will walk you through the necessary steps to transfer your Outlook data, including emails, contacts, calendars, and settings, ensuring a seamless transition to your new machine.
There are two ways in which you can move your data between your old and your new computer
- Manually backing up your Outlook data from Old Computer, and then migrate it to the new computer
- Moving Outlook Items Using the Best Outlook Migration software
First let us see how to manually backup and migrate Outlook data to a new computer, and then will move ahead with the fully automated process of moving Outlook data from old computer to a new computer using Migrate Outlook software.
Manual Method to Migrate Outlook from Old Computer to A New One:
Step 1: Prepare your old computer:
Backup your Outlook Data:
- Launch Outlook on your old computer.
- Navigate to the "File" tab and choose "Open & Export".
- Select "Import/Export" and click on "Export to a file".
- Choose the data you want to export (emails, contacts, calendars, etc.) and save it as a PST file on your computer.
Step 2: Setup your New computer:
1. Install Outlook:
- Set up your new computer and ensure that Microsoft Office or Outlook is installed. If not, install the necessary software from Microsoft's official website.
2. Connect to Your Email Account:
- Launch Outlook on the new computer.
- If you have an existing email account, enter your email address and password to set it up. Outlook will automatically configure the account settings.
Step 3: Transfer Outlook Data:
1. Transfer the PST File:
- Copy the PST file that you created in Step 1 (backup) to your new computer. You can use an external storage device or a network transfer method.
2. Import Outlook Data:
- In Outlook on your new computer, go to the "File" tab.
- Select "Open & Export" and choose "Import/Export".
- Choose "Import from another program or file" and click "Next"
- Select "Outlook Data File (.pst)" and browse to locate the PST file you transferred.
- Choose the data you want to import or select "Import everything" and click "Finish"
Step 4: Verify and Adjust Settings:
1. Check Email Account Settings:
- Verify that your email account settings, including incoming and outgoing server details, are correctly configured.
2. Test Email Delivery and Sync:
- Send a test email to ensure proper email delivery and synchronization.
3. Review Rules and Preferences:
- Double-check your rules, signatures, and preferences to ensure they are correctly set up on the new computer.
Step 5: Decommission the Old Computer:
1. Disconnect or Remove Email Account:
- On your old computer, open Outlook and navigate to the "File" tab.
- Click on "Account Settings" and remove or disable your email account to prevent any email duplication.
2. Backup Old Computer (Optional):
- Consider creating a backup of your entire old computer's data before decommissioning it. This ensures you have a copy of everything for future reference.
2. Use Outlook Migration Software to Migrate your Outlook data to a new computer:
Migrate Outlook software offers a hassle-free way to transfer the entire MS Outlook data in simple clicks. This Migrate Outlook tool easily lets you migrate all the Outlook data which includes PST files, contacts, journal entries, settings, profiles, etc. from your old PC to a new PC with ease.
The Migrate Outlook software lets you choose the items that you want to backup and also password protect the migration data. The backup data can also include the Outlook settings and configurations. Also, you can install this Migrate Outlook app on any version of your Windows system. Furthermore, the software is well-suited to work with all editions of Microsoft Outlook mailbox.
Step-by-step guide to migrate Outlook to a new computer
Step 1: Launch the Migrate Outlook software on your system. Select the Migrate button, as shown in figure a.

Figure a: Main Window
Step 2: In the next window, click on the Browse button to choose the email backup. Enter the password in the security checkbox. Hit on the Next icon.
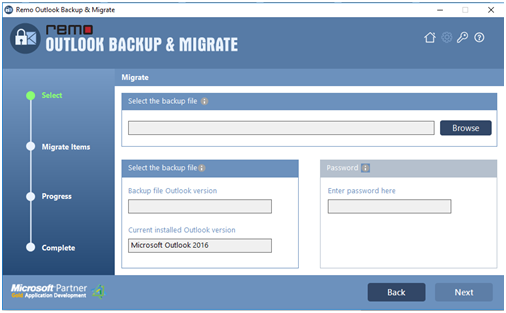
Figure b: Select Backup file to Migrate
Step 3: Then pick the items to migrate and click the Next button.

Figure c: Select Items to Migrate
Step 4: The software will proceed with the process of moving Microsoft Outlook to the new computer. After completion of the migration process, the migration summary is displayed.

Figure d: Migration Summary