Migrate Outlook data from Outlook 2003 to Outlook 2010
Microsoft Outlook is the most popular email client preferred by users to manage their personal information and emails. Outlook has improved over its previous versions. So, users who are using older versions of Outlook, prefer to upgrade their Outlook profile to version like Outlook 2010. It is always comfortable to have all our data and settings retained without any modification in the newer Outlook version. So are you thinking about how to export 2003 settings to Outlook 2010? Well, the manual technique of moving Outlook to a higher version proves to be a troublesome job to many and there are pretty high chances of losing your data. Thus, many apps are available on the internet to export Outlook 2003 settings to 2010. Among them, Migrate Outlook is the perfect software that efficiently migrates MS Outlook 2003 to Outlook 2010 in simple set steps.
Notable features of the Migrate Outlook program
- The application will create a backup and then migrate Outlook 2003 settings to 2010 successfully without missing a single attribute
- Smart enough to migrate particular attributes like contacts, emails, distribution lists, and so on without any hassle. See the steps to migrate Outlook 2003 contacts to Outlook 2007
- The utility is capable to export Outlook 2003 settings to 2010 which is highly encrypted or password protected
- Lets the users schedule automatic backup on a daily, weekly or monthly basis
- Supports till the latest versions of Outlook like- Outlook 2000, 2003, 2007, 2010, 2013, and 2016 in the migration process. To get more details about migrating from Outlook 2000 to 2007, click here: www.migrateoutlook.com/2000-to-2007.html
Thus all these features add up together and prove that Migrate Outlook software is the perfect choice to export Outlook 2003 settings to 2010. Not just this, if you want to upgrade from your current Outlook version to any higher edition, use this app and migrate the data and settings in no time.
Some useful tips to avoid data loss in the Outlook profile:
- Make sure that you have installed the Outlook program in your PC by following the right procedure. Else the PST file may get corrupted
- If you use an inbox repair tool- SCANPST to fix some issues, and if the issue is not fixed successfully, stop using scanpst.exe as it may further damage your PST file
- Always have updated backup, by scheduling backup at short regular intervals and thus you won’t end up losing any vital data
Migrate Outlook is designed using a simple interface. You can use it for migrating your Outlook profile without any extra assistance. So folks!! Download the free trial version of the app and learn how to migrate 2003 settings to Outlook 2010. If you are satisfied with app performance, purchase the tool and successfully migrate Outlook to newer versions in a few simple steps.
Easy steps to export Outlook 2003 settings to 2010
Step 1: Download and install the app. After that, launch the application and select the Migrate button, as shown in the figure.

Figure a: Main window
Step 2: Select the backup file which you want to migrate, by clicking on the Browse button. Then enter the password in the security checkbox (if you have secured your backup file earlier, with a password).
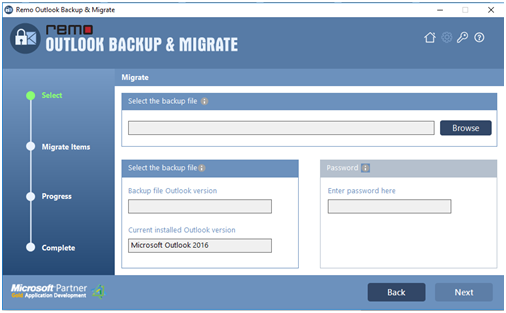
Figure b: Select the Backup file to Migrate
Step 3: Here select the Outlook items which you want to migrate and click the "Next" button as shown in Figure c.

Figure c: Select items to Migrate
Step 4: The software proceeds with the migration process as shown in Figure d. Hit on the View Report button to check the summary of the migration.

Figure d: Migration Summary