How to Migrate Outlook 2010 PST to 2013 PST File?
There is a misconception among Microsoft Outlook 2010 users that- during the Outlook migration process, it's essential to create a copy of the PST file. This is something wrong that needs to be corrected. However, the main objective of the Outlook migration process is to transfer Outlook 2010 PST to Outlook 2013, or from one PC to another. Outlook migration will be completed only if all the Outlook 2010 data including contacts, signature, settings, size, etc. are migrated to a new computer or other Outlook versions. Therefore, transfer of Outlook 2010 data can be done just by taking a copy of your PST file, but merely taking a copy PST file will transfer all your sent, received, deleted, saved, and junk emails (except your other Outlook data items like folders, journals, contacts, messages, rules, etc.).
The smartest technique to migrate Outlook 2010 PST to 2013
To safely migrate Outlook 2010 PST to 2013 successfully, one can simply rely on efficient Migrate Outlook software. Make use of this advanced algorithm to migrate entire Outlook 2010 file attributes including email folders, contacts, calendar items, journal entries, tasks, RSS feeds, rules, notes, email accounts, junk email lists, etc. to any higher MS Outlook editions with ease. It can effortlessly transfer Outlook 2010 PST to Outlook 2013 with great ease. This handy software facilitates you to choose the attributes that you need to migrate from the backup file, thus you can customize the conversion process based on your requirements. You can also use this software to migrate the Outlook 2010 PST to 2013 when you are upgrading the Outlook versions. It has the ability to migrate settings of Outlook with extreme simple steps.
Note: Migrate Outlook is also Intelligent enough to export Outlook 2003 settings to 2010 without any complications.
Situations that need you to transfer Outlook 2010 PST to Outlook 2013
- One of the most common reasons why you need to migrate Outlook 2010 PST to 2013 is to maintain a healthy backup of the PST file to deal with any unfortunate situations. Thus, if you need to migrate your PST file then this software assists you to achieve this task easily. Further, in order to know how to backup emails stored on PST file then, click here www.migrateoutlook.com/email-backup.html
- Another reason where you need to migrate the 2010 PST file to Outlook 2013 is when you have to upgrade your Outlook application to a newer version. Whenever you upgrade Outlook program you have to import old PST file to a new one, so that old data could be configured with the new tool
- Sometimes, when you want to change your PC then you need to migrate the Outlook 2010 PST to 2013 on your new computer on which you are going to configure your Outlook 2013
Importing Outlook 2010 to 2013 via Migrate Outlook tool
The Migrate Outlook software is an excellent solution that helps you migrate Outlook 2010 and other versions of MS Outlook profile in a secure manner. Besides, a simple user interface, it lets the users create timely email backups. It also facilitates you to password-protect and compress the backup file in order to free the disk space and protect it from any external threats. In addition, you can utilize this award-winning software to migrate the 2010 PST file to Outlook 2013 from Windows XP to Windows 10 systems. For more information on how to transfer Outlook 2010 PST to Outlook 2013 on Windows 7 PC, visit here migrateoutlook.com/migrate-outlook-from-xp-to-windows7.html.
Simple steps to migrate Outlook 2010 PST To 2013
Step 1: Start the Migrate Outlook application on your Windows computer. The main screen appears as shown in Figure A. First, you need to click on the Migrate button.

Figure A: Main Window
Step 2: In the Outlook Migration window, you need to select the backup file which you want to migrate, by clicking on the Browse button. Enter the password in the security checkbox (if you have secured your backup file earlier, with a password), and then click the Next button. Refer to Figure B.
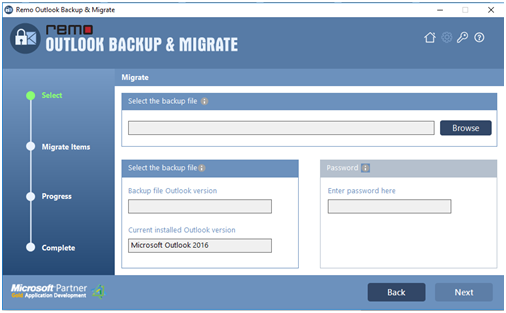
Figure B: Select the Backup file to Migrate
Step 3: Proceed to choose the items you want to migrate as shown in Figure C. Press on the Next button.

Figure C: Select Items to Migrate
Step 4: The progress of email migration will be displayed, as shown in Figure D. Wait for the migration process is complete and then check the Outlook email migration summary.

Figure D: Migration Process