Migrate Outlook Express to Outlook 2010
People often switch to Microsoft Outlook 2010 due to its variety of advanced features. Some of the advanced features are mentioned as follows: MS Outlook 2010 has the ability to manage multiple email accounts such as Hotmail, Gmail, Yahoo mail, etc. It can manage a large number of emails with ease. It can efficiently arrange appointments, share calendars and manage work plans. It has an enhanced search tool, which can quickly search and manage emails, calendars and contact files. It allows you to access social and commercial networks such as Facebook, LinkedIn, etc. MS Outlook 2010 allows you to directly receive voicemail and faxes in Inbox. There are many scenarios where you would need to Migrate Outlook software in order to transfer your Outlook data with ease.
The easiest way to move MS Outlook Express mailbox
Migrate Outlook is an expert-recommended tool to perform backup and migration of MS Outlook emails and their attributes. This tool avails an hassle-free backup and the migrate operation with its intuitive interface. The tool helps you backup MS Outlook 2010 contacts, PST data files, notes, tasks, journals, appointments, and other Outlook attributes on a daily, weekly, or monthly basis (according to your convenience). Then, the created PST backup file can be easily transferred to another computer. This advanced tool performs Outlook migration to a new computer that runs any edition of Windows OS. Check how to migrate MS Outlook files from XP to Windows 7 in quick steps.
Read further- Learn how to backup MS Outlook 2010 contacts using this software.
This legitimate email backup tool makes sure that your original Outlook data contents are not damaged or modified during the migrate or backup process. Apart from MS Outlook 2010, it is also fully compatible with all other editions- MS Outlook 2016, 2013, 2007, 2003, 2000, etc.
Steps to move Outlook Express to 2010
Step 1: The main window gets displayed as shown in Figure a. Select the "Migrate" button from the main window, as shown in the figure below.

Figure a: Main Window
Step 2: In the migration window, select the backup file that you want to migrate by clicking the Browse button. Enter the password in the security checkbox (if you have secured your backup file earlier, with a password), and then select the Next button.
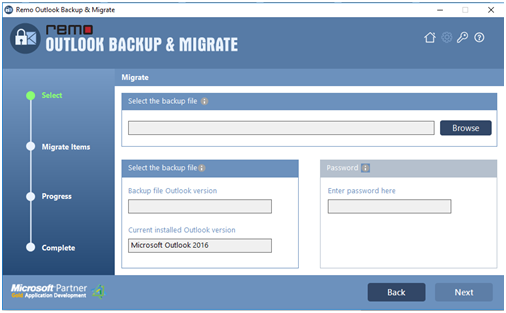
Figure b: Select Backup File
Step 3: Pick the items that you want to migrate and hit on the Next button.

Figure c: Select Items to Migrate
Step 4: The software proceeds with the migration process after you click the Next button. After completion of the migration process, the Migration summary is displayed as shown in Figure d.

Figure d: Migration Summary